
Language learningSubtitles
Dual subtitles: the fastest way to learn a language from YouTube
Two subtitle tracks at once turns any native-speaker video into a study tool — what separates a real setup from a toy one, and how to build one.
Saad Nadeem
8 min read
Updated
On this page
There is a gap between the language you learn from a course and the language people actually speak. Course audio is slow, evenly paced, and free of the swallowed syllables and half-finished sentences that make up ordinary talk. YouTube is full of the real thing, but the moment you turn on subtitles you get one track. Either the language you are learning, which you cannot quite follow, or your own, which lets you stop listening.
Showing both at once removes that choice. It is a small change and it alters what the video is for.
Why two tracks change what you are doing#
With one subtitle track in your own language, you are watching a video. Your eyes take the meaning off the bottom of the screen and your ears go idle. With one track in the target language you are decoding. The moment a sentence outruns you, you either pause or lose the thread.
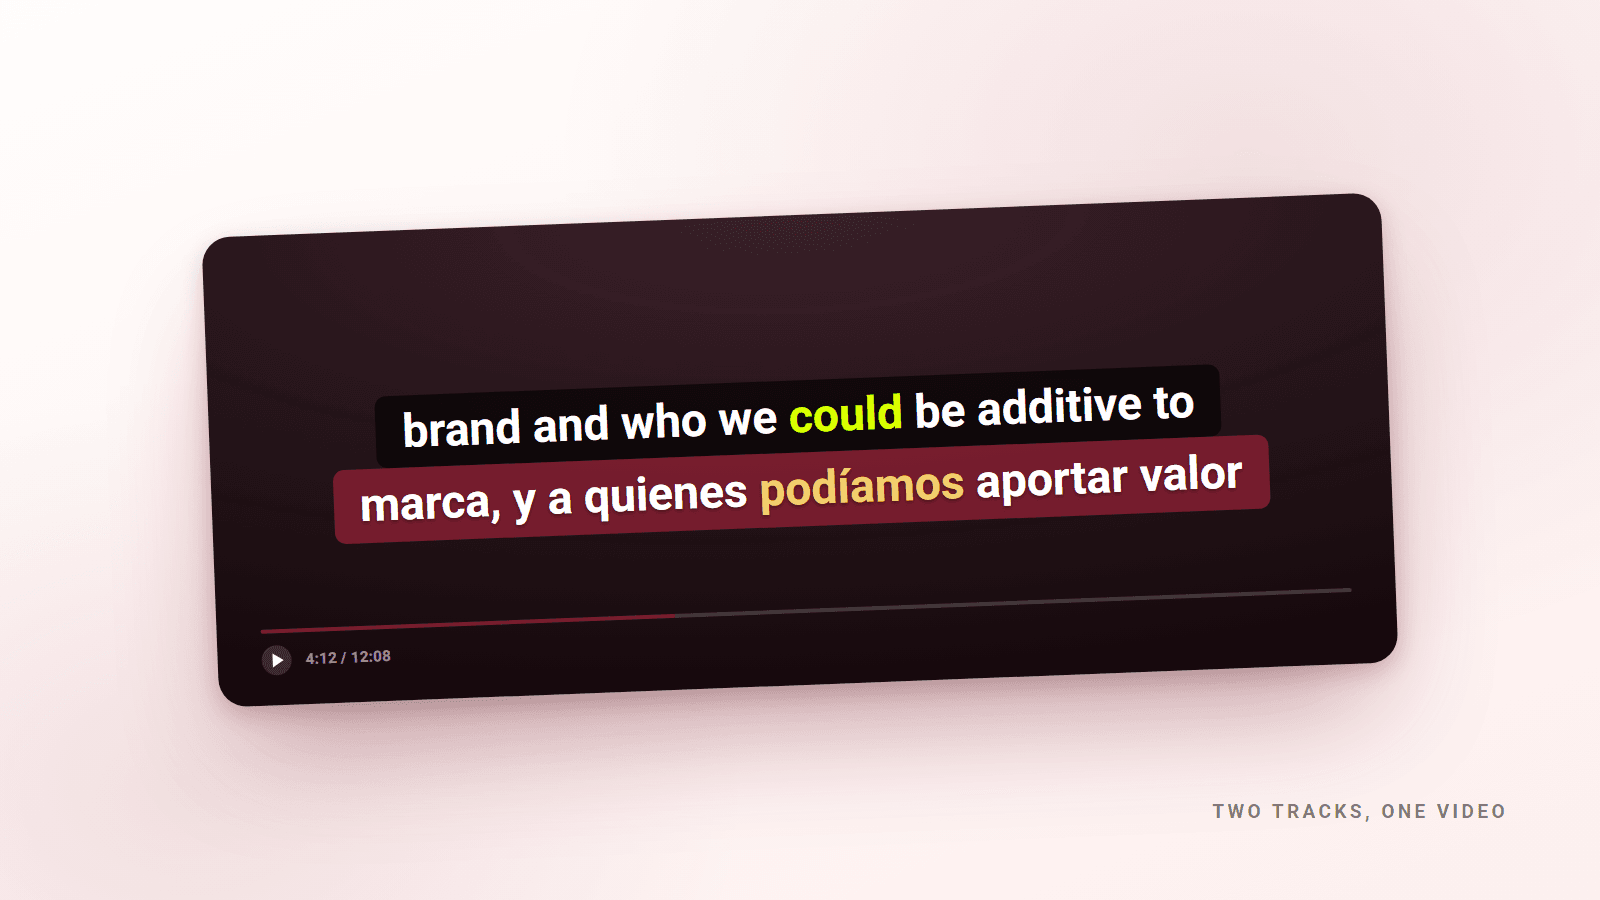
With both, the work changes. You read the target line, you hear it, and your own language sits underneath as a check rather than a crutch. You stop translating and start confirming. When the two lines disagree with what you expected, that gap is the thing worth studying: an idiom that does not map, a tense used where yours would not, a word doing a job you did not know it could do.
Which is why both lines have to be visible at the same time, not toggled. A setup that makes you switch tracks to check yourself has reintroduced the pause you were trying to remove.
Four things that separate a real setup from a toy one#
Both lines on the video, not beside it. Subtitles belong under the speaker's face, where you can read them without moving your eyes off what the mouth is doing. A transcript in a sidebar is a different tool for a different job.
The two lines do different jobs, so they should not look identical: the target language brighter, the translation quieter, present enough to glance at and faint enough that you do not read it first. That is independent styling per language, and a setup that styles both tracks the same way makes you do that sorting yourself, on every line.
Which word is being said right now? That is the whole game once speech gets fast. Sentence-level subtitles tell you what the sentence was; word-level highlighting tells you where you are inside it, which is what you need when the sounds have run together and you are trying to find the seam between two words.
And a loop. Comprehension of a hard phrase does not come from hearing it once — it comes from hearing it five or six times, which is miserable if you are dragging a progress bar and trivial if the tool just understands "repeat this passage."
Setting it up#
Install the extension and open any video. The panel appears in the sidebar, with four tabs: Transcribe, Transcript, AI Overview and AI Chat. The last three stay disabled until a transcript is loaded.
Choose which languages load, and in what order#
At the top of the panel is a row headed ACTIVE TRANSCRIPTS, with a Transcripts button showing how many exist for this video, and a gear icon beside it — that is Language Preferences.
Inside, under Arrange Languages By Priority, you build an ordered list. The column that matters is Dual Subtitle: a switch per language, described as "Automatically displays this language below your primary subtitle when available." Position one has no switch: it shows a green Always On pill, because your first language is your primary and always loads. Drag the handle at the left of a row to reorder. English cannot be removed; everything else can.
The list you choose from covers 161 languages.
Understand where each track comes from#
This is the part that decides what you actually get, and no other guide will tell you, because it is visible only if you read the chips.
Every loaded track is a pill showing a flag, a source logo and a type in parentheses.
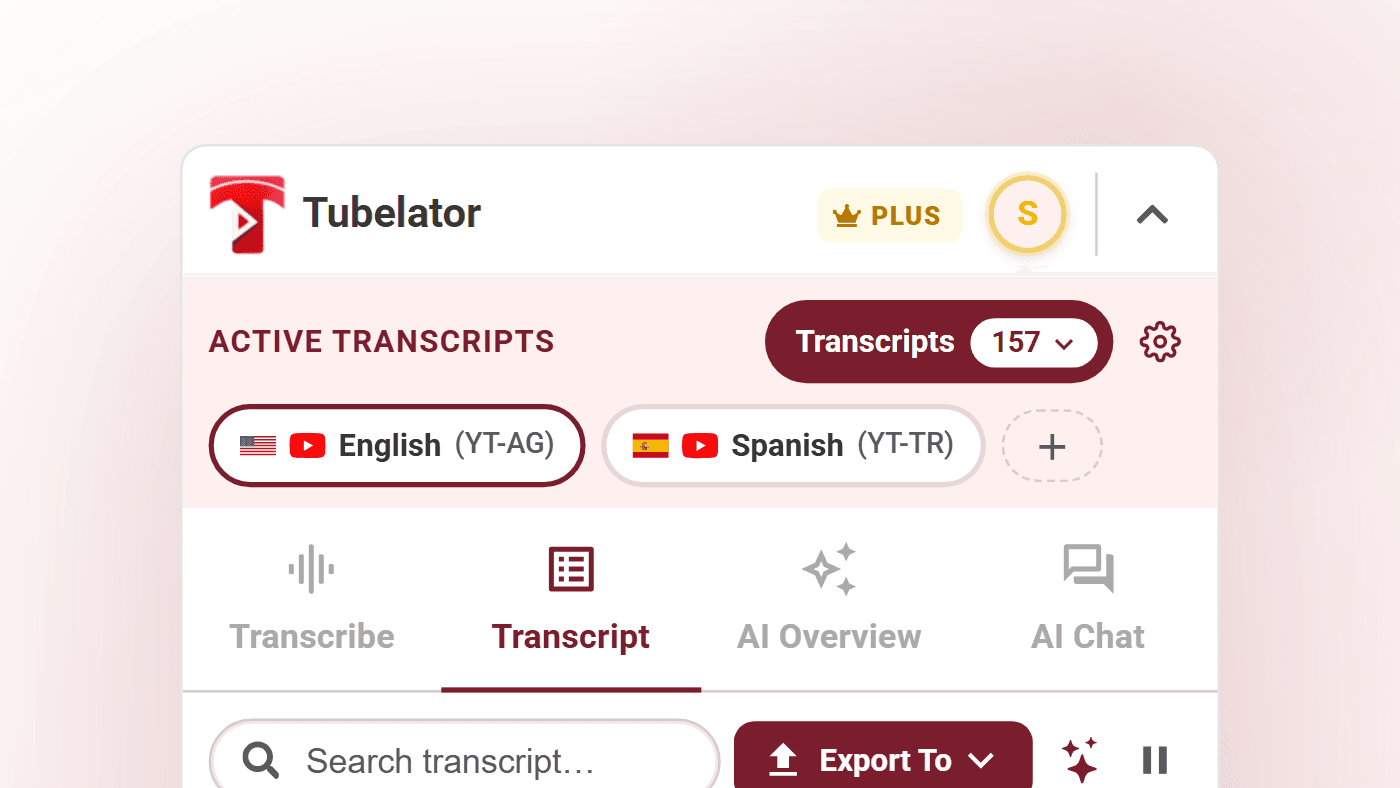
There are four kinds, and the difference is not cosmetic — it decides whether word-level highlighting is even possible:
| Chip | What it is |
|---|---|
Tubelator | A transcript Tubelator generated itself |
YT-AG | YouTube's own auto-generated captions |
YT-TR | YouTube's machine translation of another track |
YT-UP | A subtitle file the uploader supplied |
When you set a preferred language, Tubelator looks for it among the tracks that already exist and picks the best one available, in that order of quality. If nothing in that language exists, the language simply does not load. Nothing is generated behind your back. Generating is a deliberate action you take on the Transcribe tab, and it covers 98 of the 161 languages: the ones Tubelator transcribes and translates itself. The other 63 are display-only, and appear when YouTube happens to have a track to translate. For videos with no track at all, see how to translate a YouTube video to English without CC.
That distinction has a practical consequence, covered below.
Add, switch and remove tracks from the video itself#
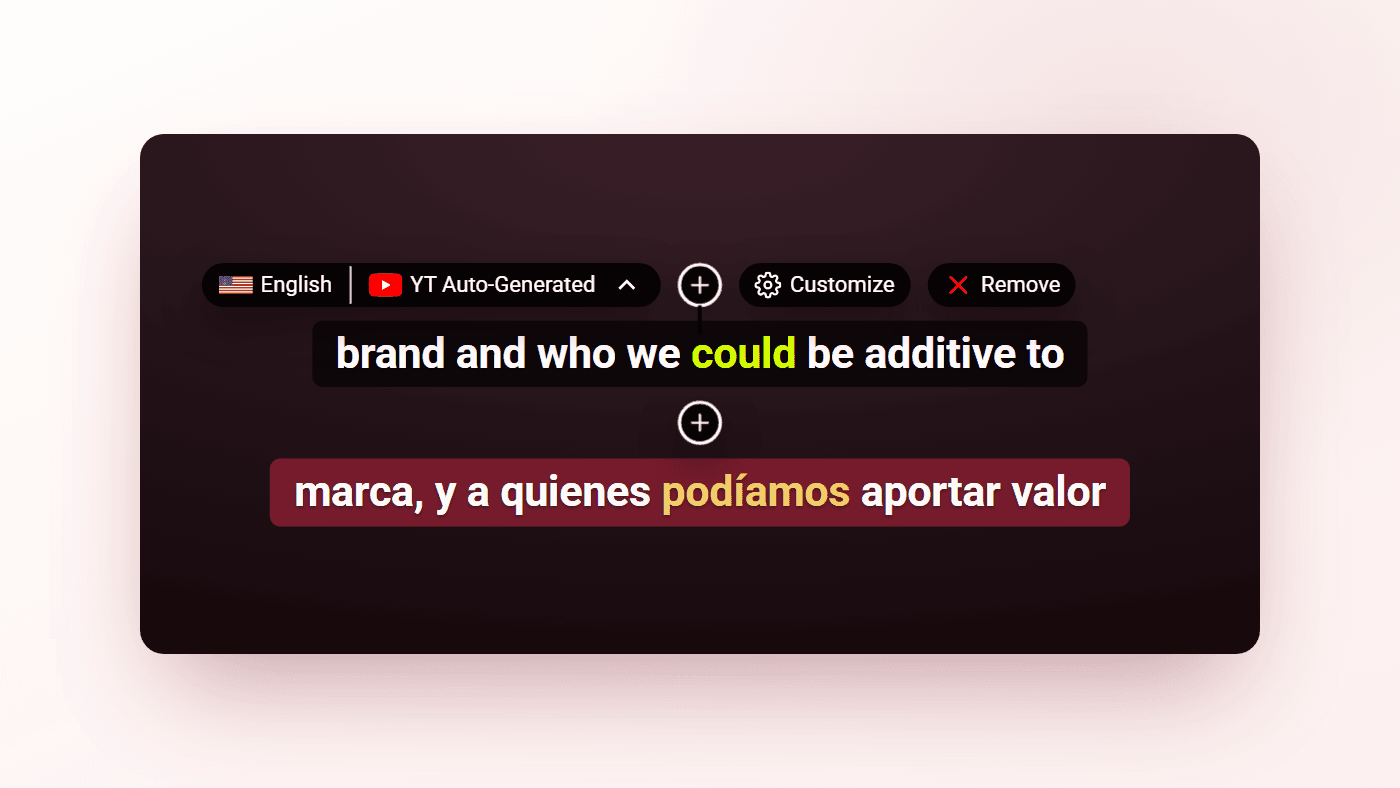
Hover a subtitle line on the video and two bars fade in. The language chip on the left (flag, language, source) is the switch control: click it to swap that line for another track. On the right sit two pills, Customize and Remove (Remove only appears when more than one track is loaded). Above and below the line are round + buttons, both labelled Add New Transcript/Language, which insert a track above or below.
To reorder the stack, drag the subtitle text itself.
Style the two lines so your eye can tell them apart#
Customize opens Subtitle Customization, with three tabs: Subtitles, Word and Presets. At the top, an Apply To: toggle switches between just this language and All Languages. That toggle is the one to watch: the entire point is styling languages differently, so leave it on the single language while you set the two tracks up.
Under Subtitles you get text and background colours, Background Opacity (0–100%), Font Size (16–80), five font families, and bold/italic/underline. Under Word there is Highlight Words: "Emphasize the currently spoken word." It has its own colours and opacity, so the active word can be styled independently of the line it sits in.
At a glance, the settings that matter for this job:
| Setting | Where | Useful range |
|---|---|---|
| Which languages load | Language Preferences → Dual Subtitle | Primary is Always On |
| Text and background colour | Customize → Subtitles | Per language |
| Background Opacity | Customize → Subtitles | 0–100% |
| Font Size | Customize → Subtitles | 16–80 |
| Active-word colour | Customize → Word | Per language |
| Whole looks | Customize → Presets | 25 built in |
Presets carries 25 built-in styles across five categories (Essential & Minimal, Creator & Viral, Cinematic & TV, Aesthetic & Themed, Fun & Creative), each with a live preview. Two are worth knowing by name for this job. Karaoke Highlight renders the line faded and fills each word in brightly as it is spoken, which is the single best setting for the target-language track. Light Minimal is quiet enough to make a good translation line underneath it. If you build something better, Save Current stores it under My Presets and it becomes reusable across languages.
The part most tools skip: looping#
Of the four criteria, looping is the one that tends to be missing, and it changes a study session most.
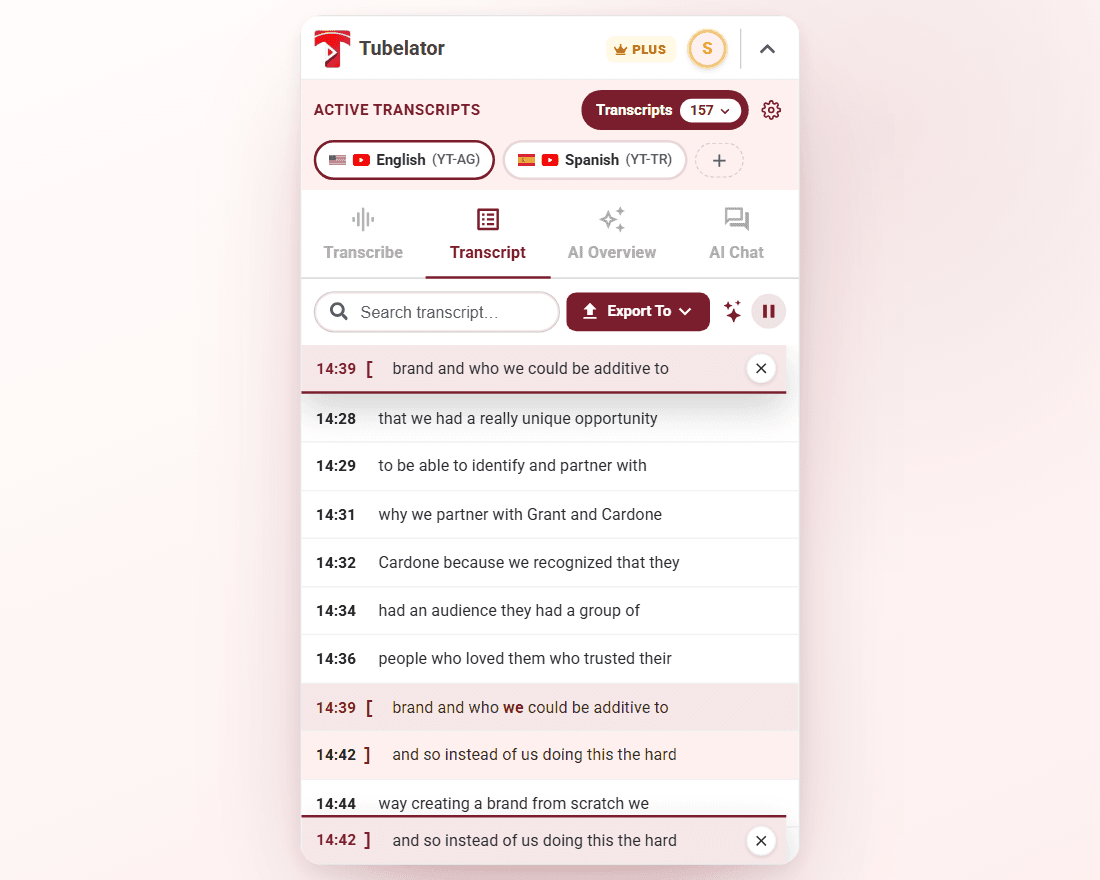
Open the ⋮ actions on the transcript line where a phrase begins and choose Set
Loop Start; do the same on the line where it ends with Set Loop End. Playback
then stays inside that passage, returning to the start each time it reaches the end.
The boundary rows are marked with [ and ], and the rows between them tint.
Three details make it usable rather than fiddly:
- Loop points snap to segment boundaries, so a loop starts at the beginning of a phrase rather than halfway through its first syllable.
- The loop survives switching tracks: change the second language and the boundaries are re-resolved against the new transcript instead of being discarded.
- It pauses during ads rather than fighting YouTube for the playhead.
The same menu also has Copy and a Speak action that reads the line aloud when you want to hear a phrase pronounced cleanly rather than at conversational speed.
It's perfect for language learners.
— Khải Đỗ, Chrome Web Store review
What this does not fix#
Word-level highlighting is not available on every track. Word timings exist on Tubelator's own transcripts and on YouTube's auto-generated captions. They do not exist on uploader-provided subtitle files or on YouTube's auto-translated tracks. Those formats carry no per-word data. When a track has none, the toggle is disabled and says so: "This transcript does not support word highlighting."
The practical upshot: if word-level timing matters to you and the video has an uploader-supplied subtitle file, generating a Tubelator transcript will give you something the existing track cannot.
Nothing caps the stack at two, either. A third track is occasionally useful (source, your language, and another you are working on), though most sessions want two.
Subtitles are a bridge. The goal is to need them less: run both tracks while a video is new, drop your own language, then turn both off and find out how much you still follow. The setup is meant to be dismantled.
Two lines of text can carry you through a video with your ears barely working, which is exactly the failure looping corrects: hear the passage, then hear it again with your eyes off the screen, and find out whether you actually got it.